 aloberita Kumpulan Berita dan Informasi terbaru dari berbagai sumber yang terpercaya
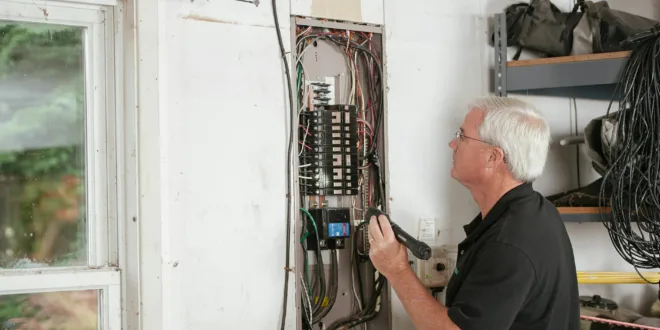
How to Upgrade Your Garage Electrical Panel for Increased Capacity
Upgrading a garage electrical panel is a common project for homeowners who need more power for tools, EV chargers, or a home workshop. This guide walks you through the decision‑making process, a practical step‑by‑step checklist, common pitfalls, and when it’s best to call a licensed electrician.
@@DASH_LI_START@@–
Decision Criteria: Is a Panel Upgrade Right for You?
Before you start buying parts, answer these questions:
- Current load vs. future load* – Do you regularly trip breakers when multiple tools run together? Are you planning to add a high‑amp EV charger?
- Panel age and condition* – Panels older than 30 years may have outdated breakers or corrosion.
- Space in the garage* – Is there room for a larger panel board?
- Local code requirements* – Most U.S. jurisdictions follow the NEC; some cities have additional permits.
If you answered yes to any of the above, you likely need to upgrade garage electrical panel.@@DASH_LI_END@@
@@DASH_LI_START@@–Step‑by‑Step Checklist to Upgrade Your Garage Electrical Panel
1. Assess the required amperage*
- Add up the amperage of all existing circuits.
- Add the anticipated load for new equipment (e.g., a 50 A EV charger).
- Choose a panel size that provides at least 20‑30 % headroom.
2. Select the right panel*
- Look for a UL‑listed, NEMA‑rated panel that matches your service voltage (typically 120/240 V).
- Verify the number of breaker slots you’ll need.
3. Obtain permits*
- Contact your city or county building department. Most upgrades require a permit and an inspection.
4. Turn off the main service*
- Shut off power at the utility meter. Verify with a voltage tester that the panel is dead.
5. Remove the old panel*
- Disconnect all branch circuit wires, label them, and carefully detach the panel from the wall.
6. Install the new panel*
- Mount it level, secure it to studs, and connect the main service lugs.
7. Reconnect branch circuits*
- Follow the labels you made earlier. Tighten connections to the manufacturer’s torque specifications.
8. Install new breakers*
- Use breakers that match the panel brand and rating.
9. Grounding and bonding*
- Verify the grounding electrode conductor is attached to the panel’s grounding bar.
10. Final inspection*
- Schedule an inspection with the local authority. Do not energize the panel until you receive approval.
> Pro tip: Keep a photo log of each connection. It speeds up troubleshooting and helps the inspector verify your work.@@DASH_LI_END@@ @@DASH_LI_START@@–
Common Mistakes to Avoid
- Skipping the permit* – Unpermitted work can void insurance and cause resale issues.
- Undersizing the panel* – A panel that’s too close to its maximum load will trip frequently.
- Mixing breaker brands* – Not all breakers are interchangeable; use the brand recommended by the panel manufacturer.
- Improper grounding* – Missing or loose ground connections are a fire hazard.
- Overloading a single circuit* – Spread high‑draw tools across separate breakers rather than daisy‑chaining.
—
When to Choose an Alternative Solution
Sometimes a full panel upgrade isn’t necessary:
- Add a sub‑panel* – If you have space in the existing panel, a sub‑panel can supply extra circuits without replacing the whole board.
- Load‑balancing* – Re‑allocate existing circuits to spread the load more evenly.
- Dedicated circuits* – For a single high‑amp device (like an EV charger), a dedicated circuit may be sufficient.
Consult a licensed electrician if you’re unsure which path saves time and money.@@DASH_LI_END@@ @@DASH_LI_START@@–
Conclusion
Upgrading a garage electrical panel is a valuable investment for homeowners who need more reliable power for tools, EV charging, or a growing workshop. By following the checklist, respecting local codes, and avoiding common pitfalls, you can safely increase capacity and keep your garage ready for any project. When in doubt, upgrade garage electrical panel with the help of a qualified professional.@@DASH_LI_END@@
@@DASH_LI_START@@–Frequently Asked Questions
| Question | Answer |
|---|
| Do I need a permit to upgrade my garage electrical panel? | Most U.S. jurisdictions require a permit for any service‑panel work. Check with your local building department before you start.@@DASH_LI_END@@
| Can I do the upgrade myself, or must I hire an electrician? | DIY is allowed in many states if you hold the proper license or are a qualified homeowner. However, the final inspection usually must be performed by a licensed professional.
| How much does a panel upgrade typically cost? | Costs vary by region, panel size, and labor rates. Expect a range of $1,200–$2,500 for a standard 200 A upgrade, including parts and permit fees.
| What size panel should I choose for a future EV charger? | A 50 A Level 2 charger plus typical workshop loads usually calls for a 200 A service with a panel that has at least 20–24 breaker spaces.
| What safety gear should I wear during the upgrade? | Insulated gloves, safety glasses, a hard hat, and flame‑resistant clothing are recommended. Always test for voltage before touching wires.
Editorial note:* This article is intended as practical planning guidance. Always verify product specifications, local codes, and site conditions before making final decisions.
Author bio:* Written by the editorial team, with a focus on practical planning, clear homeowner guidance, and SEO‑friendly educational content.