 aloberita Kumpulan Berita dan Informasi terbaru dari berbagai sumber yang terpercaya
Step‑by‑Step Garage Door Insulation Kit Installation Guide
Installing a garage door insulation kit is one of the most cost‑effective ways to improve energy efficiency, reduce noise, and protect stored items from temperature extremes. Homeowners often search for a clear, practical garage door insulation kit installation guide that walks them through the process without jargon. This article delivers exactly that—complete with buying criteria, a detailed checklist, step‑by‑step instructions, common pitfalls, and answers to the most frequent questions.
@@DASH_LI_START@@–
Buying and Decision Criteria
Before you open the box, make sure the kit you choose matches your garage door and climate needs. Consider these factors:
- Door type* – Panel, roll‑up, or carriage‑style doors have different panel dimensions.
- R‑value* – Look for a kit that offers an R‑value of at least R‑6 for moderate climates; higher R‑values are better for extreme temperatures.
- Material* – Polystyrene (EPS) is lightweight and inexpensive; polyisocyanurate (polyiso) provides higher R‑values but can be more brittle.
- Thickness* – 1‑inch panels are common, but 2‑inch panels add more insulation at the cost of added weight.
- Installation method* – Some kits use adhesive‑backed panels, others rely on clips or a combination of both.
- Warranty and fire rating* – Verify that the product meets local building codes and has a fire‑resistance rating (e.g., Class A).
> Tip: Measure the width and height of each door panel before ordering. Most kits are sold in pre‑cut panels, but a slight oversize is preferable to an undersized panel.@@DASH_LI_END@@
@@DASH_LI_START@@–Garage Door Insulation Kit Installation Guide: Tools and Preparation
Having the right tools on hand speeds up the process and reduces frustration. Gather the following before you start:
- Utility knife or insulated cutting blade
- Measuring tape (steel or fiberglass)
- Straight edge or level
- Safety glasses and gloves
- Masking tape or painter’s tape
- Adhesive (if not pre‑applied) – construction‑grade spray foam or double‑sided tape
- Screwdriver or drill (for clip‑type kits)
- Clean cloth and mild detergent
Preparation checklist*
1. Clean the door surface* – Remove dust, grease, and old weatherstripping.
—
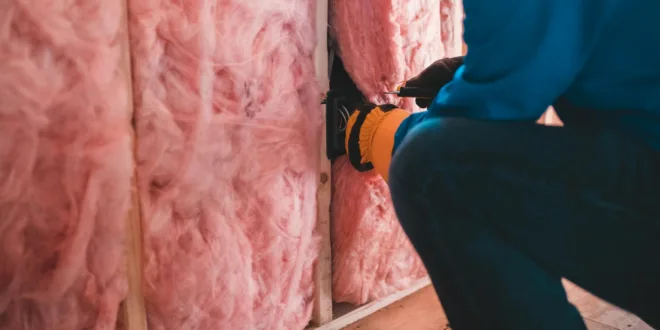
Step‑by‑Step Installation Instructions
Follow these steps in order. The process typically takes 2–4 hours for a standard two‑panel door.
- @@DASH_LI_END@@
- Measure and cut panels
- Measure the width and height of each door panel.
- Transfer measurements to the insulation panels, adding a ¼‑inch allowance for a snug fit.
- Score the panel with a utility knife, then snap cleanly along the line.
- Dry‑fit the panels
- Place each cut panel against its corresponding door section.
- Check for gaps; trim as needed.
- Apply adhesive (if required)
- For kits with adhesive backing, peel the protective film.
- For clip‑type kits, apply a thin bead of construction‑grade spray foam along the panel edges.
- Secure the panels
- Press the panel firmly onto the door, starting at the top and working downward.
- For clip systems, align the clips with the pre‑drilled holes and snap them into place.
- Seal the edges
- Run a bead of low‑expansion spray foam along the perimeter of each panel.
- Smooth the foam with a gloved finger or a foam‑compatible tool.
- Re‑install weatherstripping
- Replace any removed weatherstripping, ensuring a tight seal around the door frame.
- Test the door operation
- Open and close the door several times to confirm smooth movement.
- Listen for rattles; add additional foam if needed.
- Clean up
- Remove masking tape and dispose of cut scraps responsibly.
- Wipe down any excess adhesive or foam.
Common Mistakes to Avoid
- Skipping the dry‑fit* – Cutting panels without a test fit often leads to uneven gaps.
- Over‑applying foam* – Excess foam can expand and warp the door panels.
- Ignoring weight limits* – Heavy insulation on a single‑panel door may strain the opener; check the manufacturer’s load rating.
- Neglecting ventilation* – A sealed garage can develop condensation, leading to mold on insulation.
- Using the wrong adhesive* – Some adhesives react poorly with polystyrene; always verify compatibility.
—
When to Consider Alternative Solutions
If your garage door is already insulated, or if you have a historic home with preservation restrictions, a full‑panel kit may not be ideal. Alternatives include:
- Foam board blankets* – Easy to install but may require additional fastening.
- Reflective radiant barriers* – Useful in hot climates where heat gain is a bigger concern than heat loss.
- Professional spray‑foam insulation* – Provides seamless coverage but requires a licensed installer.
—
Frequently Asked Questions
| Question | Answer |
|---|
| Will insulating my garage door affect the door balance? | Adding insulation adds weight, which can affect the spring tension. Most residential doors can handle a 1‑2 lb increase per panel, but if you notice the door struggling, consult a garage‑door technician.@@DASH_LI_END@@
| Do I need a permit for a DIY insulation kit? | Generally, no permit is required for interior insulation. However, if your local code treats garage doors as exterior envelope components, verify with the building department.
| Can I install insulation on a rolling steel door? | Yes, but you’ll need a flexible, thin‑profile kit designed for curved surfaces. Standard rigid panels may not conform properly.
| How long will the insulation last? | High‑quality EPS or polyiso panels retain their R‑value for 10‑15 years when protected from moisture and UV exposure.
| Is spray foam better than panel kits? | Spray foam offers a seamless air barrier but is more expensive and requires professional handling. Panel kits are a practical DIY option for most homeowners.
@@DASH_LI_START@@–
Conclusion
A well‑executed garage door insulation kit installation guide can transform an under‑performing garage into a more comfortable, energy‑efficient space. By selecting the right kit, preparing the door, and following the step‑by‑step instructions, you’ll enjoy reduced heating and cooling costs, quieter operation, and better protection for stored items. Remember to double‑check local codes, verify product specifications, and keep a small amount of extra insulation on hand for future adjustments.@@DASH_LI_END@@ @@DASH_LI_START@@–
Editorial Note
This article is intended as practical planning guidance. Always verify product specifications, local codes, and site conditions before making final decisions.@@DASH_LI_END@@